02 June 2019
Building a Home Weather Station with a Telegram Bot on Raspberry Pi
…
How to Use a Raspberry Pi
Many of us have a Raspberry Pi gathering dust on a shelf, bought as a spare one day.
Using a weak computer with very slow I/O as a desktop or server is not the most enjoyable thing, although I did keep it for a while as a CI server, a thin RDP client, and even ran a full IntelliJ IDEA on it (spoiler — it works like a clock, but extremely slowly).
But as a base for small sensors — it's perfect. Let Arduino rule the market of followers, cheap boards, and modules. Raspberry Pi, however, has a full Linux system and more power, which means there are no software limitations. Most hardware works just fine on both platforms.
Sensors for many simple and fun things, like light, water level, temperature, motion, and even alcohol, are sold for around 150–600 rubles each.
For myself, I built a home weather station with a Telegram interface, and I unexpectedly got a lot of fun out of it.
So, let’s dust off the Pi.
The Bot to the Rescue
Accessing a home Linux machine over SSH is inconvenient, unsafe, and requires too much fiddling with the network.
But a bot is the perfect option both for providing an interface and for giving access to the hardware inside a closed network segment:
It’s simple. One big button “Make it good”.
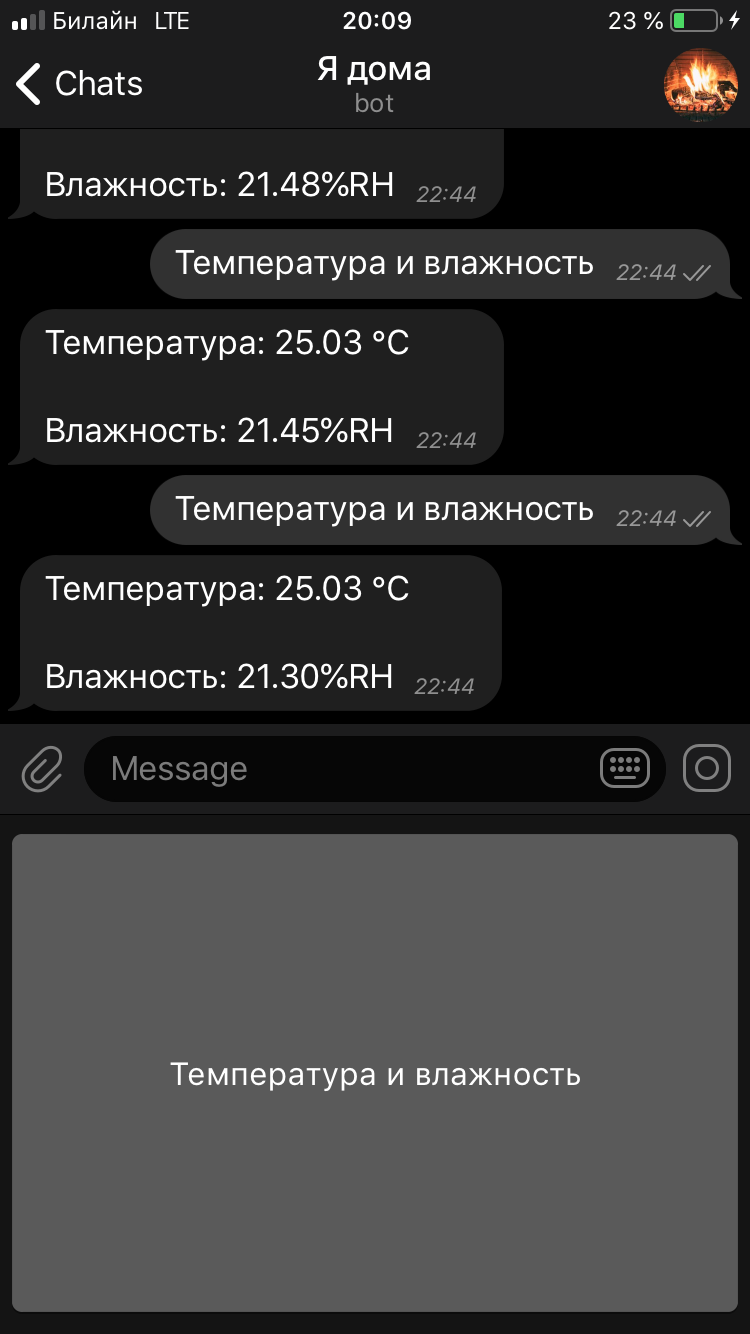
Feel free to visit! Right now at my home: http://telegram.me/i_am_at_home_bot.
Shopping
In my case, I used a high-precision weather sensor based on the SHT3x-DIS chip, working on the I²C bus, in a module from Amperka, nicely laid out:
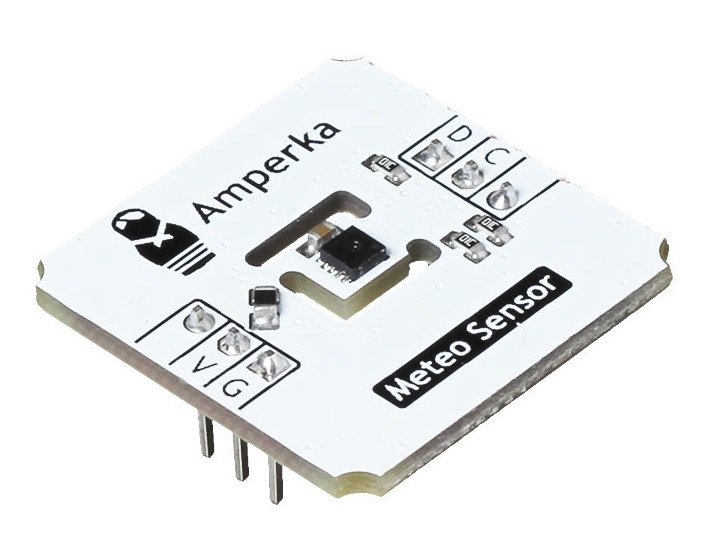
Google shows options to buy this sensor as a bare board — practice soldering pins if you want.
In Amperka’s variant, the sensor comes with the necessary wiring included. Nothing except the sensor itself needs to be purchased in the minimal setup. But if you want to assemble it more neatly than a handful of wires and a bare board, you can also get the Troyka #Structor.
We assume you already have a Raspberry Pi with Raspbian installed (I believe other distros should work fine too).
If you don’t yet have a Pi, but suddenly want one, you can add to your cart directly at Amperka:
- Raspberry Pi 3 Model B+
- Clear case
- 16GB SD card with Raspbian preinstalled (not the best option, since the card is slow and expensive for 16GB, but it’s ready to use right away)
- Power supply
On Yandex.Market you can assemble everything a bit cheaper with a nicer original case and power supply, plus get a faster microSD card (recommend UHS Speed Class 1 or higher).
It is important not to skimp on the power supply. While the Raspberry Pi can run off a power bank or any charger, under normal loads the kernel will regularly complain about undervoltage.
Connecting the Sensor
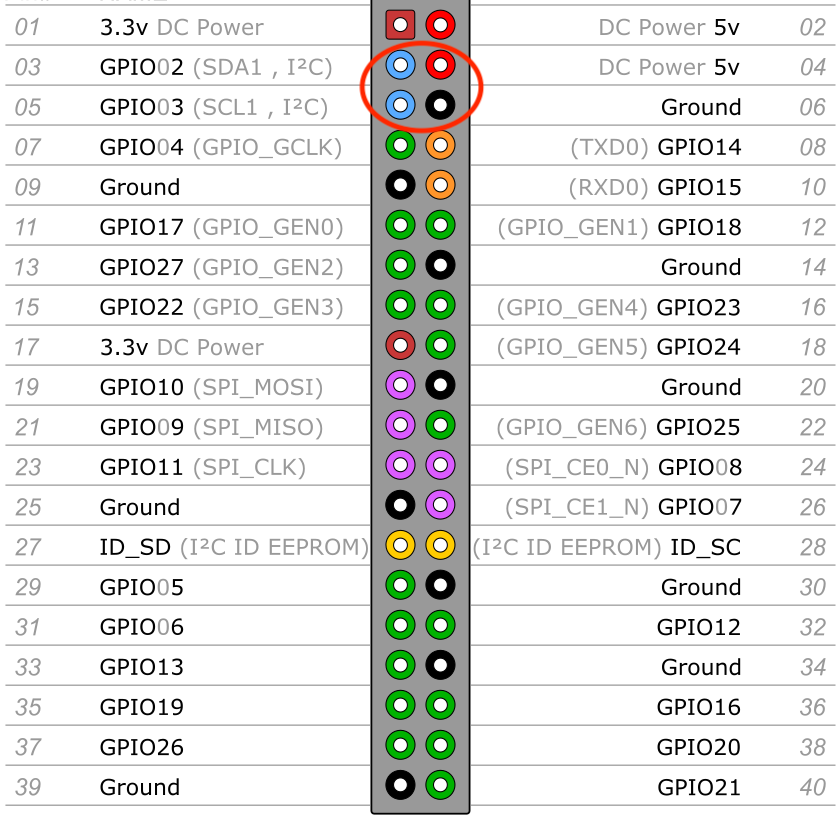
From the required pins (and with Amperka’s setup), the sensor has:
- power (04 DC Power 5v),
- ground (06 Ground),
- data input/output pin (03 SDA),
- bus clock pin (05 SCL).
In a standard Raspberry Pi layout, the sensor can be connected either with two three-wire cables or four single male-to-female wires:
Assembled:

Connect to the Pi via SSH and enable the I²C bus:
sudo raspi-config
# Далее в интерфейсе:
5 — Interfacing Options — Configure connections to peripherals
P5 I2C — Enable/Disable automatic loading of I2C kernel module
Would you like the ARM I2C interface to be enabled? — Yes
Checking the Connection
Copy the script meteoSensor.py to the Pi.
With a proper connection you’ll get:
➜  python meteoSensor.py
Temperature in Celsius is : 17.80 C
Temperature in Fahrenheit is : 64.05 F
Relative Humidity is : 27.78 %RH
Creating a Telegram Bot
Open Telegram and add the BotFather.
When creating a new bot you need to choose its name and username, add it to contacts, and save the received Access Token like this:
111111111:XXX-XXXXXXXXXXXXXXXXXXXXXXXXXXXXXXX
Installing (or Developing) the Software
People often use Python to work with Raspberry Pi hardware, but almost every popular programming language has convenient libraries either specifically for Raspberry Pi GPIO or for the bus you need (in our case, I²C).
I especially recommend Control Everything Community — a great collection of examples for a huge number of chips, in several popular languages, and for most major platforms beyond Raspberry Pi.
I built a solution in Java using:
- Spring Boot — needs no introduction (if it does, then Java most likely isn’t your thing)
- Telegram Bot Java Library — easy and convenient bot library
- Pi4J :: Java I/O Library for Raspberry Pi — the Swiss Army knife for Raspberry Pi buses
- Control Everything Community / SHT31 — working with the sensor
Running
1. Binary:
-
Download the build and copy it to Raspberry Pi
-
Install Java
sudo apt-get update sudo apt-get install -y galternatives openjdk-8-jdk -
Run by inserting into the parameters the previously obtained Telegram bot Access Token:
java -jar raspberry-pi-meteo-bot.jar --telegram.bot.token=111111111:XXX-XXXXXXXXXXXXXXXXXXXXXXXXXXXXXXX -
Open Telegram and enjoy!
2. From Source:
-
Clone the repository from GitHub:
git clone -b sht3x_only https://github.com/axelrodvl/raspberry-pi-meteo-bot.git cd raspberry-pi-meteo-bot -
In
src/main/resources/application.propertiesyou can optionally insert yourtelegram.bot.token -
Build, copy, and run:
mvn clean install
scp target/raspberry-pi-meteo-bot-0.2.0.jar pi@address:~
ssh pi@address 'nohup java -jar raspberry-pi-meteo-bot-0.1.0.jar &> meteo-bot.out&'
As a bonus — in the master branch of the repository the bot also supports a carbon dioxide sensor.
The weather station is ready, enjoy using it!